

Note: While this information is geared towards Fuji X-Series users, the info & concepts work for most digital camera brands, including Sony, Canon, and Nikon users (not just Fuji shooters).
You’ve seen the incredible images of the stars and the Milky Way, and you’re now inspired to go out and photograph it for yourself. But where do you start?
I’ve enjoyed taking astrophotography images with my Fuji cameras, and I want to help others succeed in Milky Way photography. There’s nothing more frustrating than trekking out to a dark sky, spending a night taking photos, getting disappointing results and wasting a perfectly clear night.

A Quick Summary to photographing the Milky Way
If you’re like me, sometimes you just want the quick rundown, so here’s a brief starting point (though I highly recommend reading the rest in detail for the best possible results).
Fuji astrophotography (or most DSLR/mirrorless cameras) can be done with these simple steps:
- Use an exposure between 15 and 30 seconds.
- Use widest aperture possible (around f/2 if possible).
- Start with ISO 1600.
- Focus at infinity if possible; otherwise zoom in on a bright star and make it as small as possible.
- Get away from city lights.
- Shoot close to New Moon.
HOW TO FIND AND PHOTOGRAPH THE MILKY WAY
The Milky Way is our home galaxy, which contains our solar system and nearly all the stars we see in the night sky. From here on Earth, we see our galaxy “edge-on”, which results in what we see at night: a beautiful band of light that spans across the sky.
The brightest section is the core of the Milky Way, which is the subject of many photos, and is the part that is most sought after. Depending on your latitude, the core will be visible to you during different months out of the year.

A panorama of the Milky Way taken in July from Sequoia National Forest. The bright core is on the left, the faint outer edge on the right.
Where I shoot in southern California, the core is easily visible between March and October. This is known as “Milky Way Season” because the Earth is in such a position that we’re looking at the center, or the core, of our galaxy at night. The core contains a high density of stars and dust.
The Milky Way still exists outside of the season, but it is much fainter because the Earth at night is now looking away from the core towards interstellar space, where there is only a faint amount of stars and dust.
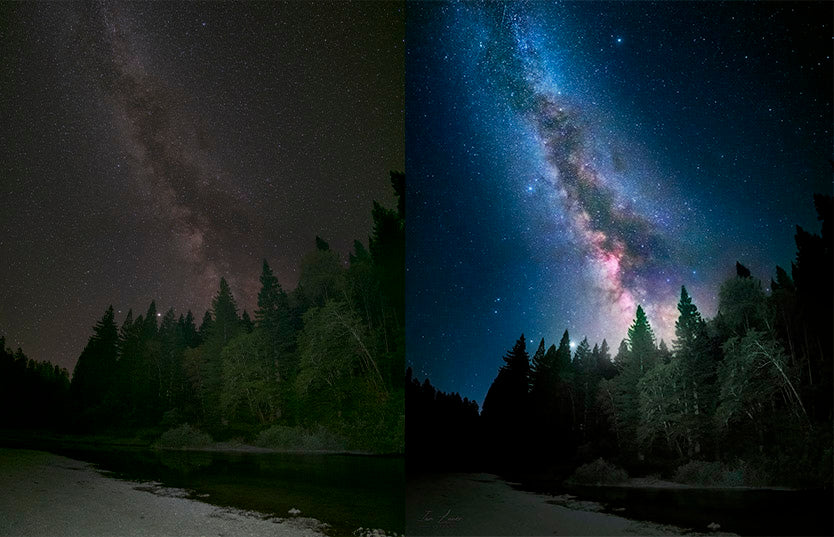
To get the best possible shots of the Milky Way, you need to travel to a dark sky location during the New Moon. While you can get some of the Milky Way from suburban locations, the best results are reserved for those who can get to dark skies.

The Milky Way 20 miles away from a light polluted city (left) and the Milky Way from dark skies (right).
There are plenty of tools, apps, and resources that will help you find where the Milky Way will be in your location. Below is a list of apps and software I use to help me photograph the core:
- Stellarium
- PhotoPills
- SkySafari
GEAR
In today’s world, there are an overwhelming amount of options for you to choose from when it comes to equipment. Like a painter’s brush, it’s not the equipment that makes you creative, but having the right tool for the job will help put your best foot forward.
Along with your Fuji camera, a wide lens and a tripod are all you need for Milky Way photography. With those three items, combined with a dark location, you’ll be able to take images that will impress!
Fujifilm Lenses For The Milky Way
When it comes shooting the Milky Way, a “fast” wide-field lens is best. By fast, I mean a small f-stop. This is because the details in the night sky are very faint, and you need to have your shutter as wide open as possible to let as much of that light as possible. A wide lens is desired to let you take longer exposures, and for the best field of view for your compositions.
When it comes to Milky Way photography, the lens I recommend the most for Fuji X users is the Rokinon 12mm F2 Lens.

Tripods
Since long exposures are required, a stable platform to shoot from is absolutely necessary for this type of photography. Any slight movement or motion can ruin your exposure. While any tripod will do the trick, I use the Radian Telescopes Tripod because it’s durable, lightweight, and allows me to shoot from various positions to get my desired composition.
You’ve got your camera, your lens, and your tripod, now let’s go over the settings you’ll need to get the best possible images.
X-SERIES CAMERA SETTINGS FOR MILKY WAY PHOTOGRAPHY

To ensure you aren’t wasting a beautiful, clear night out under the stars, let’s make sure you’ve got your settings on your Fuji camera are dialed in correctly:
- Shoot in RAW. This will let you make adjustments in post-processing while preserving all of the photo data that you captured.
- Set exposure compensation to 0.
- Set the drive dial to single exposures.
- Take long exposures, between 15 and 20 seconds. Once the exposure comes in, zoom into the stars to ensure you don’t have significant star trailing (a little is fine). If the star trails look extremely obvious, shorten the exposure. If you don’t see any, take a longer exposure.
- Use the lowest f-stop. For the same reason you take long exposures, you want to let in as much light as possible.
- Use manual focus. Focus at infinity, if possible. If you can't, point your camera at a bright star in the sky, and using the live view on your camera, adjust focus until the star is as small in size as possible.
- If your lens has the option, turn image stabilization OFF.
- Start with 1600 ISO. Since you’re shooting at night, you need to bump up the ISO to gather more signal in the dark. Increase or decrease it depending on your results, but 1600 is a great starting point. Remember, you can tease out more detail in post-processing.
- Use the 2 or 10 second delay to reduce camera shake.
- Pay attention to the histogram. Make sure you expose to the right if possible.

A 25 second exposure of a campfire under the Milky Way, taken with a Fuji XT-1, and a Rokinon 12mm lens, ISO 1600.
IMAGE PROCESSING
So you’ve got your gear, your settings are dialed in, and your first few images are coming in. Why don’t they look like what you see online?
The reason is because the final shots you see have gone through post-processing to bring out those faint details. This is where you let your creativity run wild! The more you practice and try new techniques, the more tools you will have to create fun and interesting images.
A Milky Way RAW image (left) and processed image (right), taken with a Fujifilm XT-1 camera.
Not all my photos looked like this. To help give you perspective, here’s one of my first Milky Way shots compared to when I learned more Adobe Lightroom & Photoshop techniques.

An example of how I processed images when I first started (left) compared to when I expanded my post-processing techniques (right).
There are plenty of videos out there that can help you with processing your Milky Way shots (depending on what program you use). The most popular programs are Adobe Lightroom and Adobe Photoshop.
Here are some videos to help you get started with editing your shots. Keep in mind there is no right or wrong way to edit; as long as you’re happy with your end result, that’s all that should matter!
- Editing your Milky Way photos in 2 minutes by Apalapse
- BETTER Way to Edit Milky Way Photos in Photoshop by AstroBackyard
LEVELING UP YOUR IMAGES - STAR TRACKERS & STACKING PHOTOS

Incredible Milky Way details are possible with a star tracker. This was 25 separate 30-second photos stacked together, taken with a Fuji XT-1.
Because the Earth rotates, the stars appear to move in the night sky, meaning you are limited to how long your exposure can be before seeing significant star trails. In order to get longer exposures, you can mount your camera on top of a star tracker, which follows the stars as they move across the night sky. This lets you do a number of things:
- Take longer exposures to remove star trails & reveal more detail.
- Shoot at a slightly slower f-stop, increasing sharpeness.
- Use a lower ISO to reduce noise.
- Stack multiple photos to increase detail and further reduce noise.
- Use of longer focal length lenses for deep sky astrophotography (nebulae, star clusters, and galaxies).
I’ve used a number of trackers, and these are my favorites:
You can go even further with your astrophotography by using more advanced equipment such as equatorial mounts (heavy duty star trackers) and attaching your Fuji camera to a telescope.
So there you have it! With all of this info, you’ll be ready to start shooting the Milky Way and get stunning results. Below is a recap, summarizing all that has been discussed:
ASTROPHOTOGRAPHY TIPS FOR PHOTOGRAPHING THE MILKY WAY
- Shoot on a clear night during New Moon to avoid a washed out image.
- Use apps to help locate the Milky Way.
- Use a wide-field lens (23mm or wider) to get as much of the Milky Way as possible.
- Use a sturdy tripod or put your camera on a stable platform to reduce camera movement.
- Use the lowest f-stop possible for maximum light-gathering ability.
- Shoot in RAW for image adjustments during post-processing.
- If you can, focus at infinity; otherwise zoom in on a bright star and make it as small as possible.
- Start with a high ISO between 1600 and 3200. Adjust as needed.
- Use a 2 or 10-second delay to reduce camera shake.
- Take a 15-20 second exposure. Increase the exposure time until star trails are very noticeable.
So get out there, shoot the stars, and don’t forget to enjoy the view!
Have any questions or feedback? Let me know in the comments below.
.
You’ve seen the incredible images of the st...&media=//ianlauerastro.com/cdn/shop/articles/MW_with_fuji_cover_600x.jpg?v=1610661496)
4 Responses

Barney Tong
This is great info, Ian! I have some great Fujifilm gear and look forward to staying up late under dark skies someday soon.

Iain
Hi Ian. Thank you for this information. If I do nothing else this year I’m going to go out armed with this knowledge and take me some pictures of the Milky Way. Thank you so much 😀👍🏼

Dennis Sørensen
Thanks, Ian! I am just getting into night photography, and this guide helps a lot.
Leave a comment
Comments will be approved before showing up.
Greer
November 23, 2023
I’ve got the gear and ready to go. Thanks for the tips!